Showing posts with label Self sufficiency. Show all posts

Tuesday, February 10, 2015

Mandarin Oranges

     I've been canning mandarin oranges this last little while; since their season doesn't generally coincide with when we think of canning it does seem a bit odd to have the canning supplies out again. Canning season for me generally runs from May through October, unless I have a glut of meat which then gets canned in the winter. However, you must can when the season dictates and mandarin orange season has been running for a few months and is about to wind down.

     A mandarin orange is actually a tangerine, you've probably noticed the prepackaged bags of "cuties" in your store. To can citrus you peel the fruit and then remove as much of the pith as possible. Most of the cuties have a string running up the outside that is easily removable with your thumb nail and a larger amount of pith along the inside curve.
Fruit in the jar before adding liquid

   I prefer a blend of citrus, but couldn't find blood oranges or any other good deals, so I settled for grapefruit. I used the ratio of 1 pink grapefruit per 3 lbs of tangerines. The grapefruit isn't as cooperative and most of my pieces were shredded trying to remove the tough inner skin. Add sugar if you wish, I used a scant half cup. Place the fruit in a clean jar and boil your jar rubbers for a few minutes (or wash your metal lids if you prefer. :)  ) Leave about an inch headspace and fill with orange juice, or pineapple juice or sugar syrup if that's what floats your boat. Final headspace should be 1/2", remove air bubbles and process for 10 minutes in a boiling waterbath.
Jars filled with orange juice. Not quite so pretty.  :(

     A had a gal ask me once if I liked to can. The answer is no, no I don't. I can because it's an economic necessity, it has literally kept us alive when we had little else. I can because I have definite ideas about how people (and children especially) should eat and so I need to buy fruit in season and set it back against the time when fresh fruit choices are limited. I can because I believe that it's the epitome of hubris to think that God is going to step in and provide when I'm not willing to work for it. I like the feeling of satisfaction from seeing the shelves fill up with jars, I like feeling proud of myself and I like that our children are learning to appreciate this way of life, but I don't jump up and down and think "Oh goody, I get to process fruit and jar it. Woot!Woot!"  I'm like that about many things: sewing, knitting, spinning, canning, cheese making, butchering......... I like a job well done and I'm glad to do it, but I don't do it for kicks and grins. We must be careful to guard against the mindset that we should only do what we love, we should do what needs to be done cheerfully and thank God for the ability to do so. That's what I'm striving for.

Tuesday, January 6, 2015

Rye Bread For Haters

     I loathe rye bread, it's right up there with store bought whole wheat bread for unpalatability. However, as with many things made at home, I love my own rye bread. If you're a rye bread lover, this recipe probably isn't for you, but if you think you're no fan of rye then give this a try.

     Begin by grinding some rye berries until you have a cup and a half (more or less) of fine rye flour. Mix in a half cup of plain Greek yogurt (or buttermilk if you'd prefer) and as much warm water as needed to form a thick dough. Allow to rest overnight at room temperature. For the specifics of soaking grains see this.

     The next morning in a separate bowl combine 1/2 cup warm water, 1T molasses and 2T yeast. Let rest until bubbly. Combine with 1t salt and soaked rye (which may look grayish on top, this is fine) and a pat or two or three of butter, coconut oil, olive oil, mayo, applesauce, or whatever. Begin adding white flour until dough reaches proper consistency. Allow to rise until doubled. Punch down and form into 2 round loaves, cut 2 deep slits in the top.

     Micah made me 2 round cardboard bread "molds", they're approximately 5" high and 5" across, I line them with parchment paper and place them on a greased cookie sheet. Then gently place the loaves inside.

     Allow to double again in size and then bake in a 350-375 degree oven. Dust with flour after baking. We'll finish off both loaves tonight with sausage links, sharp cheddar and fruit. Yummy homemade goodness at its best!

     As you can see, the only real difference between mine and other rye recipes (other than the soaking step) is that my recipe lacks caraway seeds. It is solely the caraway seeds that account for the yuckiness factor in traditional rye bread. Now you know.  :)

Sunday, December 28, 2014

The Economics of Laundry

     Washing laundry at home is a significant use of water, accounting for up to 40% of total household water consumption. This is partially due to the incredible water demands that a typical top loader uses, 40-50 gallons per load! After a year spent going to the laundromat and being increasingly disgusted by the cost and how poor a job the "high efficiency" washers did (after all, how high is the efficiency when the machine doesn't do the job it was designed to do?) we have returned to using a wringer washer. I spent our early married years using a wringer, we've also washed clothes by hand with a plunger and scrub brush- which is hands down the cleanest our clothes have ever gotten.

     The wringer washer takes 16 gallons to fill, in that water I wash at least 3 loads in succession beginning with the lightest/least soiled clothes and progressing to dirtier/darker clothing. As each load is wrung it is put in a bucket or basket, after the 3-4 loads are washed the tub is refilled with rinse water, each load is rinsed, wrung and then hung. The rinse water then becomes the wash water and the cycle starts again. To fill my particular clothesline I can wash 6 loads, so water consumption for me equals 48 gallons (16 gallons to wash, 16 gallons to rinse which is also the next 3 load's wash water, and 16 more gallons to rinse.) That works out to 8 gallons per load of laundry.

     To my rinse water I add a splash of vinegar, we don't like our clothes coated with synthetically scented petrochemicals, then we line dry. In the Winter (which here is mostly rain) we use lines strung on the porches, drying racks indoors and/or lines strung through the living room. It takes around 12 hours for jeans to dry, but that's balanced by increasing humidity in the house and the fact that my kilowatt usage is zero.

     I like that our laundry method leaves a gentler impact on our planet, but I like the cost savings even more. We were spending around $30/week at the laundromat. Should we want to take our laundry system off grid this washer could be converted to bicycle power in about an hour. I found one of my wringer washers on Craig's List and the other at an auction, I paid $75 and $125 for mine. I can't image a laundry system that I'd be more pleased with than this, it has everything: clean clothes, low energy use, and very low water consumption!

Friday, December 26, 2014

Increasing Tilth


     The holiday season is past and our minds immediately turn to garden plans and other Spring endeavors. We are blessed to have relatively fertile soil for the area we live in, so much of the land here is burned out due to ignorance about soil amendments and crop rotation. Our soil is clay loam and we began increasing tilth as soon as the garden was turned for the first time. Improving soil obviously benefits the gardener by increased sizes and yields and it is an easy labor. The first thing to understand is how essential nitrogen levels are, nitrogen is the building block of plant structure, having a deficiency in this area with give you stunted, yellowish plants. Some of the organic methods we've used to raise nitrogen levels are:

  1.  The addition of  composted manure (we use composted horse manure from the stable where our daughter rides).
  2. Growing plants that boost nitrogen such as beans and peas. We will avoid planting corn especially because it depletes the soil rapidly. We tried a test plot of corn last year and the results were disappointing.
  3. Adding coffee grounds, either composted first or washed grounds directly. Washing first ensures that you aren't changing the pH and making your soil more acidic, obviously if you want to change the pH then don't wash the grounds first. 
  4. Plant borage, I haven't tried this one but it would work for a cover crop (as would oats or rye) that you till back into the soil.
     Improving soil organically is a process, not an event. Every year you will see soil improvement, changing from a clay color to the deeper richer black the denotes optimum fertility.


     In more immediate news, the sap will begin rising shortly and we'll be tapping again! Though we have more taps to put in this year than we did last year, it will still fall dismally short of what we used to do. You can read about that here and here, but it's a skill that we value and want to keep alive for the children. Because we won't have the quantity that we're used to my thought is to store the sap in the freezer until we have enough to fill the cast iron pot and then boil it down outside and finish in the house. That's the tentative plan anyway. Immediately on the heels of syrup season will be a brief window and then early garden things can be planted. My garlic is doing well and I think I'm going to divide my comfrey into 3 plants instead of the behemoth it currently is. I'm excited to begin the life cycle all over again, it never grows old. 


Sunday, October 26, 2014

A Beneficial Barter

I grew up in the grape country of Western New York and though I've been away for a long while, my family still lives there. Where I live is moonshine country and after sending my almost 90 year old father a jar of Maraschino Cherries Stewed in Moonshine we decided to swap 'shine for grapes. My sister boxed up 35 pounds of Concord and Catawba grapes for me and shipped them down (incidentally, for less cost than what I could buy them for locally.) They arrived on Thursday last and by Friday we had them all jarred.
Steam Juicing the Grapes

35 pounds yielded 12 quarts of grape juice concentrate, 7 pints of grape jam, and 2 grape pies.


We are soaking the grape seeds and pulp in cider vinegar to extract the many benefits.

 A bit about grape seeds:
Although not particularly tasty, whole grape seeds are completely edible, and scientific evidence suggests that they are good for you, too. Packed with essential fatty acids, amino acids, and powerful flavonoids (such as proanthocyanidins), these little bitter seeds have been associated with a whole slew of health benefits. Eating grape seeds on a regular basis may, for example, improve cardiovascular health, reduce leg swelling and varicose veins, provide some protection against certain types of cancer, offer weight loss benefits, treat depression, and even fight yeast infections caused by Candida.
In addition, thanks to their remarkably strong antioxidant properties, grape seeds might (at least in theory) help fight certain skin conditions – such as inflammatory acne, psoriasis, and premature wrinkling of the skin – and some more serious health complications such as asthma, joint inflammation in rheumatoid arthritis patients, and problems related to eye health.
Whole grape seeds are naturally rich in flavonoids including gallic acid, catechin, epicatechin, gallocatechin, epigallocatechin, epicatechin 3-O-gallate, and perhaps most importantly, oligomeric proanthocyanidins. According to research, the antioxidant capacity of proanthocyanidins is 20 times greater than vitamin E and 50 times greater than vitamin C.
In addition, proanthocyanidins have beenshown to enhance the effectiveness of other antioxidants. As a result of the remarkably strong antioxidant power of proanthocyanidins, it is not surprising that supplement manufacturers have began to process grape seeds into pills and capsules.

Monday, October 20, 2014

Conservo Steam Oven

I've been looking for a Conservo for a little while, scouring eBay and local antiques shops to no avail. There are always a few on eBay, but for more than I wanted to pay relative to their condition. Using auction zip I found one being sold at an auction in Georgia, bid on it and won!

Made by the Toledo Cooker Company and patented in 1907 it is made with a tin body and copper bottom. The bottom, filled with water, generates the steam that bakes the items within. A nifty, low tech kitchen "appliance", my present to myself for my birthday.

It came today and I wanted to try it out immediately, but I couldn't think of anything to bake. I mused a bit and decided to use up a jar of our homemade peach pie filling and make a cobbler. I had to bake it in two bread pans because the Conservo can't hold a regular size cake pan.

I knew from a friend's experience with hers that anything baked with one will be very moist, but a cobbler should bake up just fine, right?

YES! Light, fluffy, moist, steamy goodness. Perfection.


Monday, August 22, 2011

Sumac Lemonade

So Gentle Reader we find ourselves again prepared for another exciting installment of "Everything You Never Knew You Could Eat". That's right, Mrs. G- connoisseur of boring historical minutiae and purveyor of the same, is ready to conduct you on the first leg of your tour of edible weeds and scrub bushes.

I'm assuming that at least for those of you in the Eastern U.S. that the several varieties of Sumac are easily identifiable, yes? If not, stop right here and get some good field guides or do some internet research and before you eat anything be positive of what you're consuming. If you're bright enough to get yourself dressed and use a computer then you're intelligent enough to learn to positively identify Sumac. Poison Sumac tends to get all the press leaving its humbler cousins in obscurity, but differentiating between the poison and non-poison varieties is very easy. Smooth Sumac and Staghorn Sumac both have red berries, whereas Poison Sumac has white berries, simple. You can use both the Smooth and the Staghorn varieties pretty interchangeably but you should be aware that the Staghorn has more vitamin C than the Smooth. For this recipe I used Smooth Sumac because it is what was growing at the side of the road, "hey that's Sumac STOP THE TRUCK!" and Mr. G dutifully jumps out and twists off 6 berry clusters for me. Some sort of clippers or trimmers would have made the job easier by the way.

You will need to remove the berries as the stems give a bitter taste if you don't. The outer berries will come off easily but the inner ones don't, you can dehydrate the clusters to make removal easier and to store berries for the Winter. Because Sumac berries are high in vitamin C, higher than oranges even, you should keep plenty in reserve to combat colds this Winter. The Native Americans used Sumac extensively for this purpose.
You then boil 1 quart of water and pour it over 1 cup of berries and allow to steep for 15 minutes. Strain the tea through a cloth to remove all debris, sweeten with up to 1 cup of sugar and enjoy. If you've never imbibed Sumac before go easily at first as some people allegedly have a mild allergic reaction to it. The tea can also be combined with elderberry or red raspberries to make a jelly though I've never tried it.
As an aside, many folks on the survivalist forums recommend on stocking up on Vitamin C, but these people's idea of survival tends to involve generators and fossil fuels etc all in the attempt to maintain their current comsumer lifestyle. Our family's plan tends to center around learning to live without or learning to make our own reasonable substitutes and if you share that philosophy then Sumac meshes in nicely with that.


Friday, August 19, 2011

The Taste of the Genuine


Everybody loves sweet corn, it's the quintessential summertime vegetable. Preserving corn was one of the very first foods that I learned to put up. Back then we froze our corn, which is the way that most home preservation families still do it; even among families who can they will still freeze their corn. Frozen corn tastes almost exactly like fresh off the cob, definitely worth the trouble. However, I no longer freeze corn. Once we made the decision that we wanted to move away from reliance on electricity and freezers we needed to come up with a different variety of corn to grow. Almost without exception the corn you buy at a grocery store or Farmer's Market is one of the modern super sweet hybrid varieties with the sugar enhancement gene. These types, Incredible being the most common one grown here, don't lend themselves to home canning as the sugar content caramelizes when canned resulting in brown corn. We finally settled on Country Gentleman, a late 19th century shoepeg variety.
The kernels aren't in rows but are placed hodge podge all over the cob. The taste is different than what I'm used to but we knew that going into it, we are exchanging hyper-sweet for a more realistic corn taste. Because the sugar in any corn begins to turn into starch the minute the corn is picked we strive to get our corn into the canning jars within an hour of being picked. I try to have the exact number of cobs picked to fill the 7 jars. Today it was 46. The children immediately begin to husk it and pick the silk off (we save the silk too). Then the kernels are cut off with a knife, there are specialized tools for this but I've not found any that I thought were worth the money and hassle.
For each 4 cups of corn I mix in 1 teaspoon of salt and then the corn goes into the quart jar to be immediately covered with boiling water. So we go, jar by jar, until the 7 are done. They are then pressure canned for 85 minutes at 10 pounds pressure.


When I open the jars I will sometimes add 1 tablespoon of brown sugar to each quart, this is completely unnecessary but I think it will help ease the transition to this more humble repast. I think we'll get about 70 quarts of corn this year, interspersed with corn we are still canning carrots, both plain and candied. Though I realize that canning corn isn't something that you're going to sit up at night fantasizing about, you might want to file this information away so if/when the day comes that you do need to try it you'll know how to go about it.


Tuesday, July 19, 2011

Candied Ginger Blueberry Jam


We'll have a new culinary experience this winter when we finally get to eat the Candied Ginger Blueberry Jam that I made last week. I've never really liked blueberry jam, most recipes call for too much sugar for my taste, but since I tweaked this recipe extensively I think that I might actually enjoy it! Here's the recipe if you'd like to try it, this yields 7 half pints.

4 heaping cups smashed blueberries

2 cups sugar

1 1/2 teaspoons cinnamon

3/4 teaspoon nutmeg

Combine ingredients and allow to set for 1-2 hours
Add a heaping half cup of diced candied ginger

Heat slowly on stove until very hot but not boiling

Set aside and in a different kettle bring 1 cup sugar, 1 box sure-jell lite and 1 cup water to a brisk boil.

Add contents of sure-jell kettle to the blueberry kettle

Bring to a boil stirring constantly
Remove from heat and place in jars

Can in a boiling water bath canner for 15 minutes

I made 2 batches of this jam and then we canned the rest of the blueberries like I wrote about in the Canning 101 post. I think we got 11 quarts and 11 pints. We are also in the thick of canning peaches which came right on the tail of cherries. Aleks told me that the peppers are almost ready, they will become salsa and Cowboy Candy *and* we've got green beans coming! I think this is why most farm families (those who can anyway) really look forward to winter. :-) The pace is crazy all through summer and autumn, but oh is it worth it!
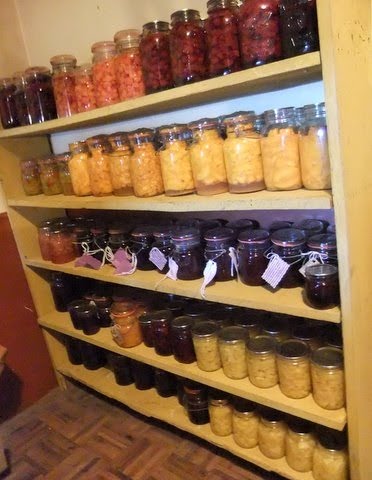
My one canning shelf still needs to be taken outside and scrubbed and then it's getting a fresh coat of paint. Until then there are jars of food completely filling 2 cupboards and much of the counter space. I feel rich!



Friday, July 15, 2011

Home Canned Fruit 101


If you're interested in learning to preserve food at home, canned fruit is the perfect place to start. Canning fruit is easy to learn and requires the least specialized equipment, perfect for the beginner! An excellent resource for all things canned is the Ball Blue Book, they walk you step by step through canning peaches; however, my method is slightly different than theirs and yields a vastly superior product. Generally fruit today is canned using a sugar/water syrup the proportions of sugar making either a light, medium or heavy syrup. Canning fruit with water necessitates adding more sugar since you're in effect making "fruit soup"; the overall effect is a watered down, super sugary, vaguely fruit tasting product. My method is easy to implement and I think you'll be pleased with the result.

1. Wash fruit to remove pesticide, bugs and unripe/overripe fruit.


2. Peel and slice fruit if needed (such as peaches) most berries can be left whole.


3. Layer fruit and sugar in a mixing bowl or bucket. I use 1/3 cup sugar per pineapple and 1/2 cup sugar per quart of Black Raspberries for instance. The amount of sugar is a personal preference and some things, like rhubarb, need more sugar.


4. Cover and allow to set at room temperature for 12-18 hours. Fruit doesn't juice up well in a refrigerator or other cold environment.


5. Place fruit in jars with a slotted spoon and top off jars with reserved juice.


6. Affix lids and can for the amount of time specified in the Ball Blue Book.


That's it! If you're used to canning fruit using the syrup method you won't find switching over to be difficult at all. Allowing fruit to make its own juice really makes sense when you think about it!


Sunday, June 26, 2011

Mother's Kitchen

Hello friends, I've been rather neglectful of this blog lately. Summer is a very hectic time for us and leaves little time for virtual reality when concrete reality in the form of produce makes faces at me everyday begging to be put in jars. We're complying at a breakneck pace but still, some days it feels like drowning. Things will settle down around October and then I can engage in other pursuits like sewing and knitting. On especially stressful days I try to remind myself to be doubly thankful for so much food and for the ability to preserve it. Some people just aren't able to put the harvest by and have to rely on grocery stores. That's a picture of my canning shelf (square nailed and mustard milk paint, Tiff :D) it's loaded with: blueberries, dark sweet cherries, light sweet cherries, peaches, rhubarb, Cowboy Candy, mulberry/black raspberry jam, blackberries, pineapple, mulberry/apple jam, black raspberries, peach jam, Lemony Sticky Sour Cherry Jam and blueberry/candied ginger jam. It's only a fraction of what we have canned and an even smaller fraction of what we will can. All of the canned dry beans, corn, green beans, carrots and most pickled things are stored elsewhere. I look at it and I feel rich. :-) I know that we will eat well this winter regardless of what happens with the economy and that gives me a peace.
We have many things that grow wild here and I feel obligated to preserve them since God has provided them. We have an abundance of mulberry products because we have mulberry trees, the black raspberries grow wild as well so they get put in jam, we will have chokecherries that will become waffle syrup and maple trees to tap in the spring. If I would neglect to take care of what has provided for us for free, then how could I ever complain about God's provision for us? If it's here and I'm able, then it goes in a jar. Our Forefathers understood this principle, that we must labor in season to provide for ourselves out of season. Modern dwellers have become accustomed to relying on an outside entity to maintain life, that's risky business in this day and age.
Take care, I hope you're enjoying your summer!

Thursday, April 14, 2011

Spring at home

My two oldest, Aleks and Katie, went to Tennessee this past week. They stayed with Meggie, a friend of Katie's and had a wonderful time! They got to see mountains and historical sites, as well as meet interesting characters like Joe. That's Katie proposing to Joe as Aleks and Clive (Meggie's Dad) look on. They have had so many interesting stories to tell about what they saw and did. For Aleks it was a working vacation of sorts, Clive owns an antique grist mill that he grinds corn in to sell to a distillery and he also does historical restoration. They were moving a log barn into Gatlinburg last week. Aleks loved the work and really enjoyed himself. Katie got the opportunity to spend time with a very Godly young lady who is like an older sister to her. It was a nice break for both of them, they work hard here and deserved a vacation, but oh, am I glad they're home!
Aleks' tomato plants grew an amazing amount while they were gone, he has about 100 left after thinning them out. They're all heirlooms, what we don't use will be sold at the Farmer's Market. He also has oodles of peppers and tobacco started too. I want to get my culinary herbs going, but haven't yet. We won't plant anything outdoors until May but I'm excited to think about canning again. Last year, in the thick of it, I was plenty tired of doing it but it kept us eating and eating well, this winter! Most of my canned food is gone, I have some tomatoes, some meat and 4 jars of beets/parsnips/carrots/squash and that's it! It's a good feeling to have jars upon jars lining the shelves.


We were in Kidron today so we stopped by Lehman's, they had a flood there and some merchandise is marked down 70%. I bought this cutesy little 1 gallon keg for $15 and 2 real bayberry hand dipped candles made in Zoar for $3.

Though I pointed out to Aleks and Katie that the Forsythia is in bloom and there are daffodils galore, they sniffed disdainfully at this cold Northern weather after their foray into the South. We still need a fire many mornings, though by noon it's warm enough for the cow to go on her picket and the calf to go in her portable pen so she can still see Mom while she grazes. It's much more pleasant to hang laundry out now that Spring has arrived!

Friday, March 18, 2011

Two and a Half Day Grits

Do you like grits? I don't, at least not the pre-packaged instant variety that we found and bought once from the Bent-N-Dent. I decided to experiment with real grits made the old fashioned way and this is how it's done. On day 1 you place 1 inch of pickling lime in the bottom of a 2 quart jar and fill with water. Allow to set for at least 12 hours and then pour off the water into a clean container leaving the lime in the bottom. You can find pickling lime in the canning section of your grocery store.


On Day 2 after you have poured off the lime water into a separate canning jar you can prepare your corn by shelling 3 cups of kernels. This is Micah and I shelling our dried open pollinated corn from last year.

Grind the corn coarsely, this is important because it needs to be ground much more coarsely than you want wheat flour to be. Measure out 3 cups corn meal into a bowl.

Pour 3 cups of lime water into your 3 cups corn meal. Mix it up well, it might look a little greenish and that's fine. Let set overnight.

Why do I need to soak my corn? Our ancestors knew that corn needed to be soaked in lime water to release the Vitamin B3 which otherwise remains bound in the grain and unavailable to you. Soaking also improves the amino acid quality of proteins in the germ. Pellagra was a once common disease in the rural South when farmers were encouraged to leave off the old ways for the "Modern Age", it is due to vitamin b3 deficiency. Sometimes the old fashioned way really does work and has logic behind it; that's certainly the case here.

The next morning bring 3 cups of water to a boil with 1 teaspoon real salt. When water boils add your soaked corn, liquid and all. Reduce flame and stir constantly to avoid sticking. Cook until thickened and serve with butter, maple syrup, sorghum etc. For leftover grits mix 1.5 cups grits with 1 egg and form into patties, fry in butter and serve with a pork product. Mmm!
These grits were light years different than the instant stuff. They tasted like real food.
In other news, we're still in the throes of syrup making. I should actually be in the kitchen finishing some off instead of blogging. :-) It has been a good season so far. I'm always glad to see it start and I'm always glad to see it end!


Sunday, February 6, 2011

Goings on

It's Sunday morning, almost noon and we're done with church so I thought I'd write a bit. We've been going through Hebrews, I enjoy hearing Mr. G expound on it, but it's deep stuff so we take it only a chapter per week. Katie opened a can of pork and mixed with BBQ sauce for pulled pork sandwiches for lunch. We've had that quite a lot this winter. Our seed orders are ready and we've been discussing buying 2 bummer lambs to raise for meat. I like lamb and another source of grassfed meat would be welcome. The men have been cutting wood every day or sometimes every other day, Levi and Micah haul it home and then Mr. G and Aleks split it. Lately it's been yummy, fragrant cherry.

We watched a hawk swoop down the other morning and kill one of Micah's banties. :-( There are mice, voles and rabbits galore, but the hawk prefers "chicken welfare". Tansy is due to calve in another month or so, I'm ready for it! We're eagerly checking the weather in anticipation of syrup season. I just ordered another 20 gallon cast iron cauldron. In some areas of the country you can pick them up for very little money, here however, they go for way too much money! The Amish still use them and demand drives up the price. Anyway, I bought both of ours from the same folks in SC. They're honest, decent people and I enjoy doing business with them. Syrup boiling should go twice as fast now. Aleks and the boys use the roaring fire to melt lead to cast their bullets. It helps break the monotony of sitting up in the sugar camp for hours, plus it's a useful skill.

In the background there is our deceased vehicle. So, currently we have no working transportation! :-) Woo Hoo! Mr. G is working some things out, so by hook or by crook we should have something figured out in a day or two. That's pretty well the sum of happenings in our neck of the woods!

Monday, August 23, 2010

I Am In Canning Paradise


We have a lot going this week in the canning kitchen. Over the weekend we canned tomato juice-21 quarts, salsa-10 pints, chokecherry/peach jelly-10 half pints and the Cowboy Candy that I blogged about before. This week we have more of all of the above to can as well as pears, more peaches (hopefully),


and Tennessee Sweet Potato Squash (that's it above, they're huge) and Pie Pumpkin. I'm canning both the squash and pumpkin in a sugar syrup, the pumpkin will have cinnamon and nutmeg added, then you can open a can and voila'! pumpkin pie, pumpkin muffins, steamed pumpkin pudding, pumpkin bread, the list is almost endless. I will can some pumpkin plain because we like it in Winter Vegetable Chowder (that has parsnips, carrots, beets, squashes and pumpkin). I'd like to can beef tips this week, but I might not get to that. I love canning but the sewing suffers when I'm busy putting things in jars and the canning suffers when I'm sewing a lot. Such is life. There isn't enough "me" to go around some days. :-) I put an advertisement in our local newspaper to purchase canning jars and over the past few weeks I have acquired about 600 more jars, there are jars *everywhere*! We have hundreds of jars filled already and plans to fill most of the rest. Life is busy, work is good, I am happy.

Saturday, August 21, 2010

Cowboy Candy


On the canning docket today was Cowboy Candy, a yummy blend of hot peppers in a bread and butter pickling sauce. It's good on hotdogs, burgers, scrambled eggs or poured over cream cheese as a cracker dip. I am a complete wimp about hot peppers but I do like this!


Cowboy Candy
12 cups of pepper rings: bell, jalapeno, sweet banana, chili, any peppers that you like or if your name is Reber or Shumway then add lots of habanero or cherry bomb. :-D
4 cups of onions of onions
2 1/4 cup vinegar
1 1/2 cup or water
6-8 cups of sugar (8 cups if you like it sweet)
2 TBS of mustard seed
2 tsp of turmeric
2 tsp celery seed

-Wash and cut peppers & onions into thin slices and put in a large pot with the water and vinegar...bring to a boil
-Reduce heat & simmer until tender, about 10 minutes
-Add remaining ingredients
-Bring back to a boil then reduce heat and simmer for another 10 minutes
-Pack clean, hot, sterilized jars and lids leaving 1 inch headspace, adjust lids.
-Water bath can for 20 minutes
Yields about 7 pints

Thursday, August 5, 2010

1863 Child's Wrapper

Rebekah's tenth birthday is this week. Every girl gets at least one new dress for her special day, it's a great matter of discussion and debate about what will be found hanging from their peg board or hooks on their birthday morning. That's generally how we do it, you awake to find your special frock made just for you to spend your special day in. I decided to make Rebekah a wrapper trimmed in a style I found in the "Children's Fashions" section of Godey's Lady's Book from February 1863. I don't know if a wrapper might have been worn to milk the cow but Rebekah wanted to show her brothers how she looked. :-D

A wrapper was worn for breakfast and other times when one might not want to be fully attired in the many layers required for the 1860's. It was also worn for times of sickness and invalidism.
The bodice closes with 6 original calico buttons that I've been saving for a special occasion.
It is piped at the neckline and armscyes and has coat sleeves cut on the bias with cuffs cut on the straight grain.

Since this wrapper is designed to show off the petticoat I wanted to make her something other than an ordinary, plain affair. I decided on a tucked petti, this one is made of cotton sateen and has 11 quarter inch tucks; one for each year we've been privileged to have her as a part of our family and one to grow on.

I will have other birthday photos later this week but it's supper time and I need to run. Have a lovely evening.


Wednesday, August 4, 2010

1860's Knitted Baby Vest

I have been working, for about a month now, on a knitted baby vest. I know that knitted vests were common in the Civil War era and it seemed like a wonderfully warm addition to Asa's winter wardrobe. Previous to beginning this project I could: cast on, knit and purl so I had many new skills to learn if I wanted to knit this vest. I learned how to increase and decrease, make buttonholes, crochet an edging and attach two knitted pieces together. And finally, today, the vest in finished!!!
And, wonder of wonders, it doesn't fit. Wow, oh good. I was hoping to have spent all that time for nothing. :-) Actually, it isn't quite that disastrous. You see, for the belt I tried knitting on circular knitting needles (something I had never done before) and the stitches looked wonky. I don't know, maybe there's a trick to making your knitting look neat on them? Anyway, I chucked the circulars and did the belt on regular needles, doing rows of 12 stitches. However, that made the buttonhole sit vertically instead of horizontally like the others. The belt is a bit snug (I didn't block the belt, by the way) and it makes the button pop out of the hole. I suppose the next step is to remove the belt and knit a new, larger one and then crochet new edging for it and re-attach, but I'm not really up for that right now so I guess I'll put it away and sew for a while. :-/

Tuesday, May 18, 2010

A Dream Fulfilled

A dream of mine to own a wood burning cook stove was fulfilled yesterday as I am now the proud owner of the most beautiful stove ever manufactured!
I have been searching eBay and Craig's list for months in the hopes of finding a suitable stove. I found several that fit the bill but they were in Michigan or Texas or Tennessee and without a truck it just wasn't feasible. Last friday I found this one on eBay for a really nice price but it was in Albany, so I called my travelin' sister to see if she had business up that way. And she did!!! She had to pass within 20 miles of where the stove was in order to pick up her son from college, can you believe it? :-)

So it was hastily arranged for her and a sweet friend with a truck to pick it up for me on Saturday and then they turned around and delivered it to my door yesterday.
They also brought a load of goodies from my folks: a double bed with mattress, box spring, head and foot board, lots of books and magazines, sheer curtains for my livingroom, some shirts for Katie..... :-)


The stove needs the fire bricks replaced and it needs an over rack, but it's pretty well ready to go other than that. I am now in search of a couple of cast iron waffle irons, even the thought pleases me, just thinking of waffles, lol. I am so blessed and happy, I can hardly believe it!